Drone Playground using Docker Compose
 Photo by Maarten van den Heuvel
on Unsplash
Photo by Maarten van den Heuvel
on Unsplash
This guide walks through a Docker Compose based setup of Drone 0.5 along with
Gitea Git Service and AWS S3 compatible Minio Storage Service. The primary
purpose is to have a local setup that enables you to play around with Drone.
This setup includes a local Docker aware DNS service as well.
Instructions here are based on the following setup:
- Ubuntu 16.04 with git, curl, openssl and browser support
- Docker 1.13.x
- Docker Compose 1.9.x
Make sure
dockerdis already up and running.
We will be using the Docker host filesystem based data volumes to persist the playground data. Let us go ahead and create this directory.
mkdir -p ${HOME}/dpdv # Docker Playground Data Volume
The templates/files covered in this guide are available in the Git Repo. Clone this Repo to get started.
git clone https://github.com/handnot2/drone-playground ${HOME}/drone-playground
cd ${HOME}/drone-playground
cp docker-compose.yml.tmpl docker-compose.yml
cp drone-server.env.tmpl drone-server.env
cp drone-agent.env.tmpl drone-agent.env
cp minio.env.tmpl minio.env
mkdir -p ${HOME}/dpdv/gitea-dv/gitea/conf
cp ${HOME}/drone-playground/gitea-app.ini ${HOME}/dpdv/gitea-dv/gitea/conf/app.ini
We will go through portions of the docker-compose.yml file covering
each of the services that together make up the Drone playground. As we go
through this guide, you will be prompted to replace placeholders in these
files with appropriate values. (For example, KEY=<CHANGE_ME> should be
changed to KEY=new-secret-value)
“Resolvable” DNS setup
We need a DNS solution that meets the following criteria for this guide:
- Ability to address docker containers by name from the containers
- Ability to address docker containers by name from the Docker host
While there are other options such as Consul, etcd and dnsmasq, we will be using gliderlabs/resolvable. This DNS service meets our needs in the context of this Drone playground.
The resolvable DNS server inserts and removes itself from the Docker host
/etc/resolv.conf file when it is started or shutdown. This service tracks
the Docker container lifecycle to keep it’s registry entries
current.
When this service is launched using Docker Compose, we need to provide
the default/current DNS nameserver used in the system so that
resolvable can fallback when it is not able to resolve a domain name.
We also want to make this service as one of the DNS servers that Docker Daemon
relies on by default. For this to work we need to bind the DNS port 53 on
the resolvable container to that same port on the default Docker bridge
network that our playground services will be part of.
DEFAULT_NAMESERVER_IP=$(grep nameserver /etc/resolv.conf | awk '{print $2;}')
DOCKER_BRIDGE_IP=$(
    ip -o -f inet addr show docker0 | awk '{print $4;}' | sed -e 's/\/.*$//'
)
Let us use the above information in the Docker Compose service definition
for resolvable:
  mydns:
    image: gliderlabs/resolvable:master
    hostname: mydns.try
    domainname: try
    network_mode: bridge
    ports:
      - "<DOCKER_BRIDGE_IP>:53:53/udp"                               # [1]
    dns:
      - <DEFAULT_NAMESERVER_IP>                                      # [2]
    volumes:
      - /etc/resolv.conf:/tmp/resolv.conf                            # [3]
      - /var/run/docker.sock:/tmp/docker.sock                        # [4]
    restart: always
[1] Bind DNS port in the container to the default Docker bridge interface. We will be adding the default Docker bridge interface IP as a DNS server IP in the Docker Daemon default configuration later.
[2] The DNS server to fallback to when the provided name is not by the DNS container locally.
[3] This is the option that allows us to use the container names from the Docker host. (Ref)
[4] The socket mount is used by the DNS container to listen to life-cycle events and appropriately update the DNS records. This keeps the DNS records up-to-date.
Replace <DOCKER_BRIDGE_IP> and <DEFAULT_NAMESERVER_IP>
with appropriate values in docker-compose.yml file.
Docker Daemon Default DNS Resolution
As mentioned earlier, we are going to change the Docker daemon defaults
configuration so that the DNS resolution includes this DNS container.
The daemon defaults are specified in the file /etc/docker/daemon.json.
Create this file if is not present on your system. You will have
to sudo to create/edit this file. (This is a better option than modifying
the daemon control file.) Make sure to use appropriate IP values.
{
  "dns": [ "<DOCKER_BRIDGE_IP>", "<DEFAULT_NAMESERVER_IP>" ]
}
Since the Docker daemon defaults have changed, we need to restart the daemon:
sudo systemctl restart docker
If you run into DNS issues and you already have a DNS solution that better meets the two requirements called out earlierer, stick to what works for you and remove the “mydns” service definition and the
depends_onreference to it from thedocker-compose.ymlfile.
Gitea Container Setup
The Gitea service is defined in docker-compose.yml as follows:
  gitea:
    image: gitea/gitea:1.0.2
    hostname: gitea.try
    domainname: try
    network_mode: bridge
    ports:
      - "10022:22"
      - "3000:3000"
    volumes:
      - ${HOME}/dpdv/gitea-dv:/data
    depends_on:
      - mydns
    restart: always
When Gitea service starts up, it picks up the configuration information from
/data/gitea/conf/app.ini. Since we are mounting /data on
${HOME}/dpdv/gitea-dv, Gitea will pickup the file we had copied earlier.
There is no need for further changes to this file. Here are the settings
we use in app.ini:
APP_NAME = Gitea
RUN_USER = git
RUN_MODE = prod

[repository]
ROOT = /data/git/repositories

[repository.upload]
TEMP_PATH = /data/gitea/uploads

[server]
APP_DATA_PATH    = /data/gitea
PROTOCOL         = http
DOMAIN           = gitea.try
HTTP_PORT        = 3000
ROOT_URL         = http://gitea.try:3000
DISABLE_SSH      = false
START_SSH_SERVER = false
SSH_DOMAIN       = gitea.try
SSH_PORT         = 22
OFFLINE_MODE     = false
LFS_START_SERVER = false

[database]
DB_TYPE = sqlite3
PATH    = /data/gitea/gitea.db

[session]
PROVIDER        = file
PROVIDER_CONFIG = /data/gitea/sessions

[picture]
AVATAR_UPLOAD_PATH      = /data/gitea/avatars
DISABLE_GRAVATAR        = true
ENABLE_FEDERATED_AVATAR = false

[attachment]
PATH = /data/gitea/attachments

[log]
MODE      = file
LEVEL     = info
ROOT_PATH = /data/gitea/log

[service]
REGISTER_EMAIL_CONFIRM    = false
ENABLE_NOTIFY_MAIL        = false
DISABLE_REGISTRATION      = true
ENABLE_CAPTCHA            = false
REQUIRE_SIGNIN_VIEW       = true
DEFULT_KEEP_EMAIL_PRIVATE = false
NO_REPLY_ADDRESS          = noreply@gitea.try

[mailer]
ENABLED = false

[security]
INSTALL_LOCK = false
While the above app.ini file takes care of most of Gitea configuration,
the setup is still not complete. We need to create an admin user for Gitea.
We are going to take care of this a little later after we cover the setup
for other services.
Minio Configuration
Next up is the Minio data storage service. Here is the service definition in
docker-compose.yml:
  minio:
    image: minio/minio
    hostname: minio.try
    domainname: try
    env_file:
      - minio.env
    network_mode: bridge
    ports:
      - "9000:9000"
    volumes:
      - ${HOME}/dpdv/minio-dv/export/minio1:/export
      - ${HOME}/dpdv/minio-dv/config/minio1:/root/.minio
    depends_on:
      - gitea
    command: server /export
    restart: always
The Minio service needs credentials to startup. These same credentials are also
used when communicating with the Minio service from Drone. The service
definition is setup to use an environment variables file for this purpose.
Edit ${HOME}/drone-playground/minio.env file with the access and secret
keys you want to have for the Minio service.
MINIO_ACCESS_KEY=rel_repo_key
MINIO_SECRET_KEY=<CHANGE_ME>
Change the above values as needed (min 8, max 40
characters - check Minio Docs). You can use urandom and openssl to
generate a secret key as shown below:
head -c 18 /dev/urandom | openssl enc -base64
Drone Server Setup
The Drone service definition in the docker-compose.yml file is:
  drone-server:
    image: drone/drone:0.5
    hostname: drone.try
    domainname: try
    privileged: true
    env_file: drone-server.env
    network_mode: bridge
    ports:
      - "8000:8000"
    volumes:
      - ${HOME}/dpdv/drone-dv:/var/lib/drone/
    depends_on:
      - gitea
      - minio
    restart: always
The environment variables for the Drone server are available in
${HOME}/drone-playground/drone-server.env file as shown below:
I_UNDERSTAND_I_AM_USING_AN_UNSTABLE_VERSION=true
I_AGREE_TO_FIX_BUGS_AND_NOT_FILE_BUGS=true

DRONE_DEBUG=true
DRONE_SERVER_ADDR=:8000

DRONE_OPEN=true
DRONE_SECRET=<CHANGE_ME>

DRONE_GOGS=true
DRONE_GOGS_URL=http://gitea.try:3000
DRONE_GOGS_PRIVATE_MODE=true
DRONE_GOGS_SKIP_VERIFY=false
Make sure to change the DRONE_SECRET value in this file.
This is a shared secret that Drone uses to authenticate a Drone agent.
Use the same secret value in both the server and agent. You can use the
urandom and openssl commands as shown before to generate this shared
secret.
Drone Agent Configuration
Drone agent service definition in docker-compose.yml is given below:
  drone-agent:
    image: drone/drone:0.5
    privileged: true
    env_file: drone-agent.env
    network_mode: bridge
    volumes:
      - /var/run/docker.sock:/var/run/docker.sock
    depends_on:
      - drone-server
    command: agent
    restart: always
Here is the corresponding ${HOME}/drone-playground/drone-agent.env file.
I_UNDERSTAND_I_AM_USING_AN_UNSTABLE_VERSION=true
I_AGREE_TO_FIX_BUGS_AND_NOT_FILE_BUGS=true

DRONE_DEBUG=true
DRONE_SERVER=ws://drone.try:8000/ws/broker
DRONE_SECRET=<CHANGE_ME>
Just as we did with the Drone server, change DRONE_SECRET in this file. Make sure to use the same secret for both server and agent.
Finishing up
At this point we have got all the pieces in place and ready to start the Drone playground for the first time. We still need to complete some steps interactively to get Gitea fully ready before we use the Drone server.
Go ahead and start the playground using Docker Compose:
sudo docker-compose up -d
You should now be able to see the five containers started by the Compose orchestration.
sudo docker-compose ps
DNS Verification
Now that the playground is up, let us make sure the resolvable DNS service
is functioning as expected.
ping -c1 mydns.try                                               # [1]
sudo docker run --rm alpine ping -c1 mydns.try
sudo docker run --rm alpine ping -c1 www.google.com
sudo docker run --rm alpine ping -c1 unknown-domain              # [2]
[1] Able to reach DNS server Docker container by name from host.
[2] Should fail with “bad address” error.
Gitea Admin User
We are going to rely on the Gitea WebUI to create a Gitea admin account.
If you go back and look at the Gitea app.ini file, you will see the
INSTALL_LOCK = false option. Upon the first time web interaction, Gitea
prompts you to create an admin user. Once created, Gitea automatically turns
this lock on so that subsequent web UI interactions do not prompt for
this again.
Open up a browser and enter the Gitea URL: http://gitea.try:3000
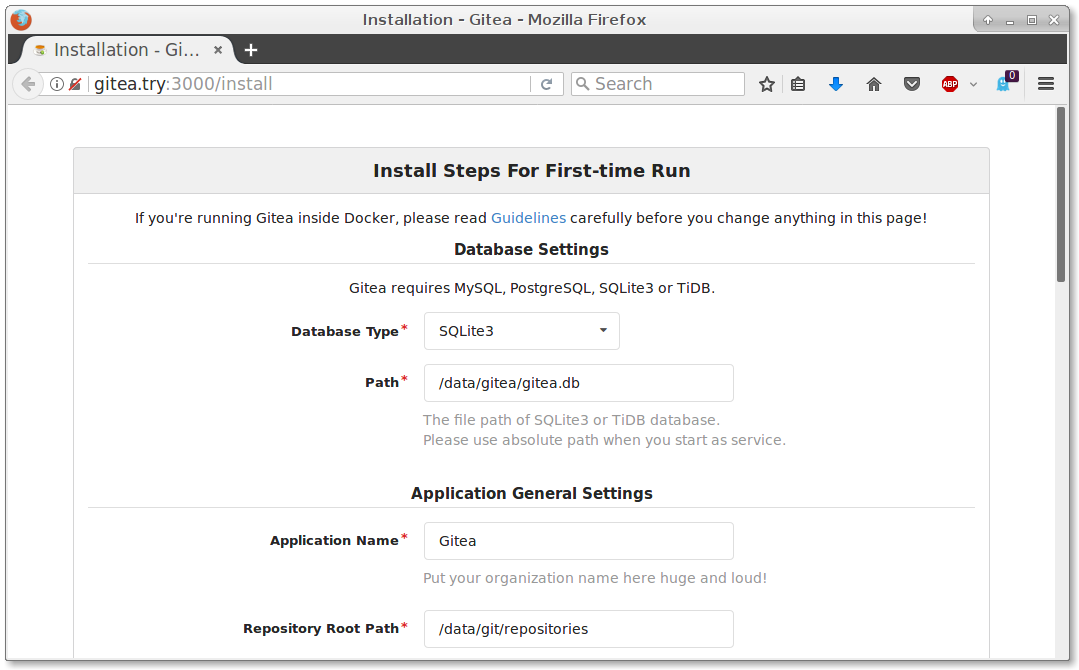
You will see a page with Install Steps For First-time Run at the top.
Most of the options are already setup in ${HOME}/dpdv/gitea-dv/gitea/conf/app.ini.
Make sure that Database Type is set to “SQLite3”. Gitea comes built-in with SQLite3 database.
All that remains to be done is to create the admin user. Scroll down to the bottom of this page to the section titled Optional Settings. Click on Admin Account Settings. Provide the following:
-
Username: arbus -
Password: changeme -
Confirm Password: changeme -
Admin Email: youremail
Use your own username and password. Make sure to note them down. You need these credentials to access Gitea as well as the Drone Web UI.
Click on Install Gitea after entering these values. This completes the Gitea
installation.
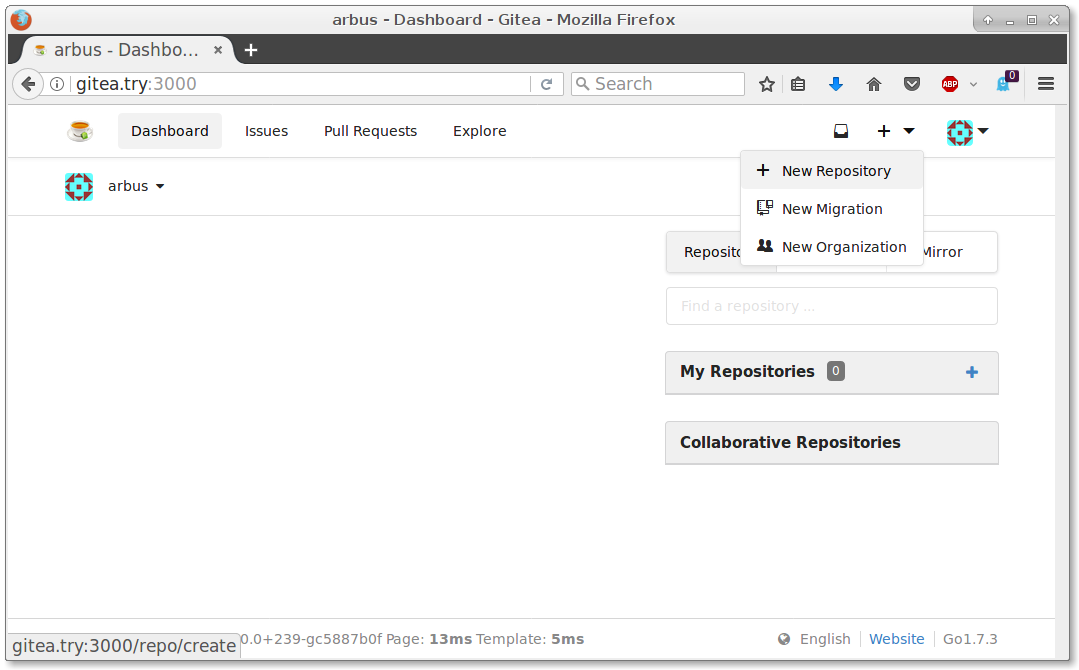
Sign in as the newly created Gitea admin user to verify that the setup is completed successfully.
Gitea Test Repo
Explore the Gitea Web interface and create a new repository called test1.
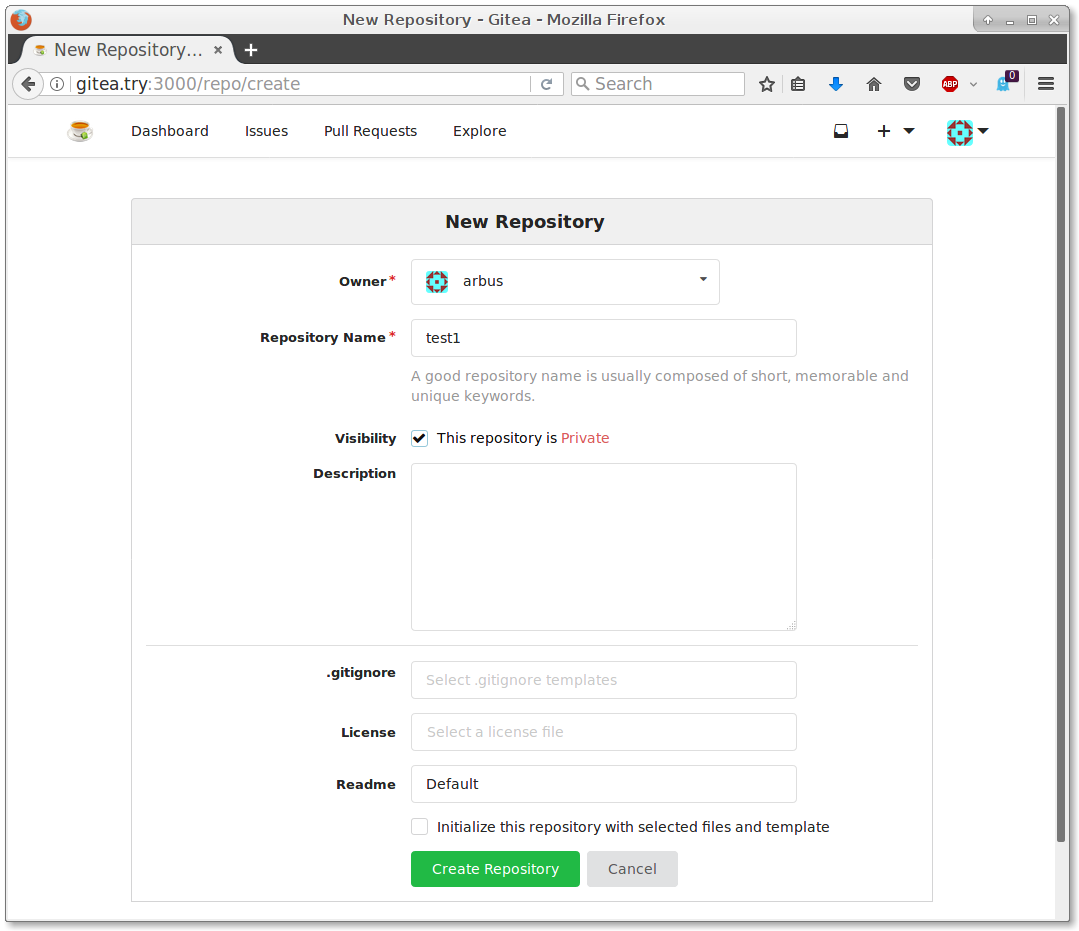
Let us clone this test Repo and add a Drone control file for verification purpose. Use the name of the Gitea account you just created in the following commands in place of "arbus".
git clone http://arbus@gitea.try:3000/arbus/test1 ${HOME}/test1
cd ${HOME}/test1
cat > .drone.yml <<END
pipeline:
  task1:
    image: alpine
    commands:
      - echo "From task1"
END
git add .drone.yml
git commit -m 'added .drone.yml' .drone.yml
git push -u origin master
When prompted, enter the password for your Gitea account. We will use this Repo to verify the Drone setup shortly.
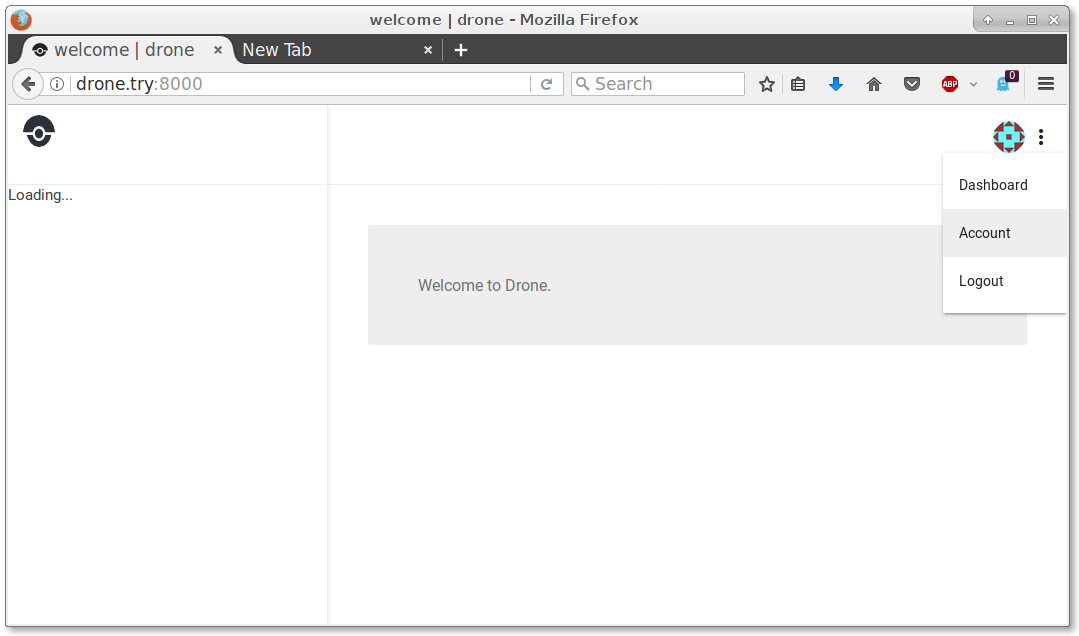
Drone Web UI
Launch the browser and enter the Drone web UI URL:
http://drone.try:8000. You should see Welcome to Drone.
Click on the login link to bring up the login page.
When configured to work with Gitea, Drone relies on Gitea for user authentication.
Enter the Gitea Admin user account and password that was created earlier and
click on the LOGIN button. You should now be in an authenticated Drone session.
If you run into any login issues check the Drone server and Gitea logs.
sudo docker-compose logs drone-server
sudo docker-compose logs gitea
Select the “Account” menu item. You should see the test Repo that was created
in Gitea show up. The test1 Repo we had created earlier should be listed
in the UI. There is a grey slider next to the Repo name in the UI. Turn this
slider to the on position (just once) to activate this Repo in Drone.
When activated, Drone automatically registers a webhook in the Gitea Repo.
This is how webhook notifications from Gitea Repo changes trigger a
Drone pipeline in the Repos’ .drone.yml file. You can go back to the
Gitea WebUI and look at the test1 Repo “Settings” to verify the automatically
registered webhook.
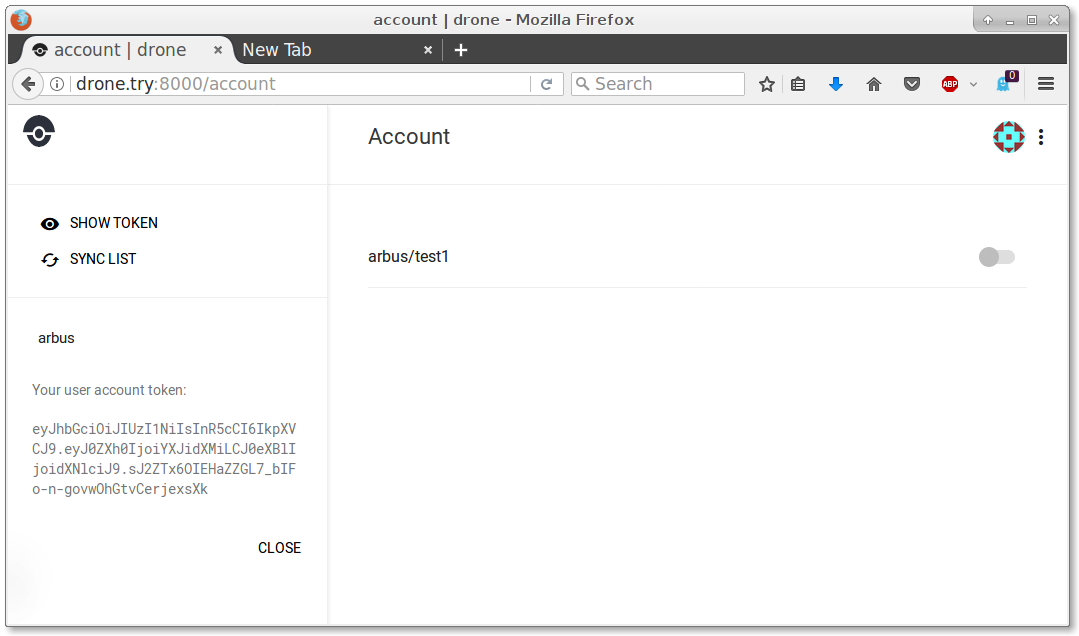
Next, let us get the token we need for the Drone CLI tool from the Web UI. Click on “SHOW TOKEN” on the left panel. Copy the user account token shown for later use with Drone CLI. (Resize the browser window wider if you don’t see the left panel.)
${HOME}/test1Repo, change theechocommand in.drone.ymlfile, commit and push the change to Gitea. Then switch back to the Drone Web UI to check out the results of the triggerd Drone build.
Drone CLI Tool
O.K. Let us complete the playground setup by installing the Drone client locally using the following commands.
cd ${HOME}/drone-playground
curl http://downloads.drone.io/release/linux/amd64/drone.tar.gz | tar zx
chmod +x drone
Drone client needs the Drone server URL and a token to be able to interact with the Drone server.
./drone --help
Rather than passing these as command line options, we will set the environment
variables DRONE_SERVER and DRONE_TOKEN. Get the value of the token
(user account token) from the Drone Web UI (“SHOW TOKEN” is available
under “Account” menu.)
export DRONE_SERVER=http://drone.try:8000
export DRONE_TOKEN=<Replace with the user account token copied from web UI>
The Drone client is now ready for use with these two environment variables set.
./drone info
This should list information about the user associated with the DRONE_TOKEN.
Let us explore the Drone client a bit more. We will activate the newly created Repo in Gitea and get a list of activated Repos.
./drone repo ls
./drone repo info arbus/test1
Make sure to replace `arbus` with the name of the Gitea admin user that was created earlier.
Conclusion
Congratulations! You now have a working local Drone playground!
You can start and stop the playground with the Docker Compose command:
sudo docker-compose up -d               # start playground
sudo docker-compose down                # stop playground
sudo docker-compose logs drone-server   # check the Drone server logs
If you want to get rid of the playground, make sure to stop the docker-compose
and remove the ${HOME}/dpdv folder.
sudo docker-compose down
sudo rm -rf ${HOME}/dpdv
You can refresh to the desired versions of the services by removing
the respective Docker images (sudo docker rmi), update the docker-compose.yml
file with the desired version tags for the Docker images
and restart the playground.
We will use this post as the basis for few more covering different aspects of Drone.
For Drone and Gitea related issues and questions in general and in the context of the playground, use the respective discussion groups or gitters along with a link to this post. That ensures support from the broader community.
References
This guide is a collection of information gleaned/collected from various discussion forums, chat channels and online documentations.
| Drone Playground | https://github.com/handnot2/drone-playground |
| Docker | https://docs.docker.com/ |
| Dockerd | https://docs.docker.com/engine/reference/commandline/dockerd/ |
| Docker Data Volumes | https://docs.docker.com/engine/tutorials/dockervolumes/ |
| Drone 0.5 | http://readme.drone.io/0.5/ |
| Drone 0.5 CLI | http://readme.drone.io/0.5/install/cli/ |
| Drone Plugins | https://github.com/drone-plugins |
| Drone Forum | http://discourse.drone.io/ |
| Drone Gitter | https://gitter.im/drone/drone |
| Gitea | https://gitea.io/ |
| Gitea with Docker | https://docs.gitea.io/en-us/install-with-docker/ |
| Gitea Configuration | https://docs.gitea.io/en-us/config-cheat-sheet/ |
| Gitea Gitter | https://gitter.im/go-gitea/gitea |
| Minio | https://minio.io |
| Resolvable DNS | https://github.com/gliderlabs/resolvable |